Wednesday, March 14, 2018

Montessori environments...and a little bit of Guacamole too!


Monti Kids' booth last week at an event in L.A.

As you all know, I have transitioned out of the classroom and into a full time role with Monti Kids. Just after I put in my two weeks, the school announced it was closing.  I then guided a former parent through what to look for when touring Montessori schools, and I figured this would also be very helpful information for you too!

The name Montessori has never been copyrighted, which is a great thing... and a not so great thing. Without the strict restrictions, schools are able to incorporate Montessori into their classrooms and curriculum, allowing children to thrive and benefit from the power of Montessori all over the world! On the other hand, many programs now claim to be Montessori, without even following many basic principles.
Below is a list that will help guide you when observing a Montessori toddler environment.
  • There should be real items over plastic including, dishes (silverware, plates, glasses, etc.)
  • Work cycle (2-3 hour uninterrupted work cycle)
  • Activities are color coded (to support a child's sense of order and acts as visual reminders)
  • Everything is child-sized and at their eye level (pictures on wall, shelves, tables, etc.)
  • The environment is orderly and purposeful
  • Teachers meet the child at their eye level (sitting on stools, bending down, squatting, etc.)
  • How are children redirected? (positively, without the use of "no," calmly and respectfully)
  • An area where children can walk into the environment independently (parents should not come into the child's classroom space)
  • Accessible toilets
  • Working area, which is divided into four sections: practical life, language, psychosensory motor developmental aids, and an area for expression (art, music)
  • Beautiful and clean environment
  • Many many many flowers!
**I'd love to hear what else you think is important in a Montessori environment. Please share!**

While I am no longer in the classroom, my dear friend Lisa, from Living Montessori, took over my environment and sent me a picture of a beautiful food preparation activity she did last week with the children. I am so excited to share it with you!


You will need:
  • Avocados
  • Small tongs to transfer the avocados
  • A serving dish in which to mash the avocados
  • Salt and pepper in a small dish
  • Lemon juice
  • Small masher
Transfer the avocados into the serving dish, along with the salt and pepper and lemon juice, mash the avocados and enjoy!

Tuesday, February 27, 2018

An exciting announcement and a simple sorting activity

Hello everyone! It has been a very busy month, which is why I have been slacking a bit on my weekly posts, but I have exciting news to share with you. While I have loved my time working in a Montessori classroom, I am happy to announce that I have taken a new full-time position with Monti Kids as their Affiliate Program Manager. I actually started working as an affiliate with Monti Kids last year, and I couldn't be more excited to join their team. While my official start date isn't until Thursday, I was able to join Monti Kids at a local event here in Costa Mesa, as well as at the AMI (Montessori International Association) Refresher Course in Phoenix two weeks ago! It was a wonderful experience getting to know other Montessorians, spreading the word about Monti Kids, and truly feeling refreshed and invigorated.

My dear friend Lindsey stopped by the Monti Kids booth at an event in Costa Mesa. Here he is working with a toy from their level 7 kit! He is also using Sprout Kids' table and chair set!

                                     
At the AMI conference in Phoenix, we were able to display our toys, meet families, teachers, and school directors!


And...because this is a blog about cooking with kids, I really want to share this very simple sorting activity that helps to stimulate a child's stereognostic sense and ability to problem solve, supports repetition and concentration, and allows a child to practice their fine motor skills as they transfer with tongs.


When preparing the activity, make sure to choose fruits (or any other object or type of food) that are different. For instance, I chose blueberries and strawberries because they are different in color, taste, size, and shape. Simply Real Foods Market has many dried fruits that would also be perfect for this activity. Place a couple of pieces of each fruit into the bowls in which the fruit is sorted as a way to guide the child to know which bowl the fruit should be sorted. Often, the preparation of this activity makes it so that you don't even need to give a lesson!

I am really excited to continue to grow in the Montessori world, and I know my new experience will allow me to bring different information to share with you all, as well as more cooking with kids activities!


Friday, February 2, 2018

Pizza Friday!

This week, I put together my Sprout Kids children's table and chair set. They have created furniture that is natural and made from environmentally sustainable materials. It was also incredibly easy to put together. I felt so accomplished and proud after setting it up in my garage. I can't wait to put it to use!


Now...let's jump right into the good stuff...

I have recently been going through a pizza obsession. Every time it is in the teacher's lounge, I always need a slice. I crave it for dinner, basically every night, so it was only natural that I incorporate it into my classroom's food preparation activities.

Having everything organized from left to right, on a tray, and in the same color really supports your child's sense of order.


You will need:
  1. Some type of bread to be used as the crust. In class, I usually use bagel thins or mini bagels. They are strong enough to hold the sauce and cheese, and because they are "thins" and "minis," they are not too heavy, keeping the recipe healthy
  2. A container for the bread you have chosen
  3. Pizza sauce. Simply Real Foods Market has many organic, natural, and non-GMO options
  4. A small knife used to spread the pizza sauce
  5. Shredded cheese. This can be done with any type you have on hand. On this particular day, we used cheddar cheese, but mozzarella and other varieties are good options too
  6. A small cutting board
  7. Small tongs used to transfer the bread
  8. A serving tray. I have the children place the prepared pizzas directly onto the tray that will be placed into the toaster oven (see pictures below)
Why do I love this activity? Besides the fact that I love pizza, this activity also provides a child with the opportunity to explore with their senses, refine their fine motor skills, and provide for their community. Additionally, homemade pizza is a much healthier alternative.


Sitting next to your child, demonstrate how to use the tongs to transfer a bagel onto the cutting board. Using slow and purposeful movements, use the knife to pick up the pizza sauce and spread it onto the bagel. Make sure to model how to use your non-dominant hand to keep the bagel steady while you spread. Using your hands (a wonderful opportunity to enhance your child's sense of touch), show how to sprinkle cheese on top of the sauce. Finally, using both hands, demonstrate how to transfer the prepared mini pizza onto the serving tray. Invite your child to repeat. Repetition allows your child to concentrate and solidify their skills and knowledge. You have the option of eating the pizzas immediately or putting them in the oven for a couple of minutes to give them a little more crispiness and melt the cheese. Yum!

Miles' grasping skills, as well as the ability to rotate his wrist while spreading, are strongly supported while using the knife.

Look how focused Miles is! Also, observe how his left hand is keeping the bagel steady while spreading.

Miles might like pizza more than I do! Food preparation truly allows a child to create and reap the benefits of their hard work.


This week, we have focused a lot on the importance of supporting a child's fine motor skills. If you are interested in other Montessori-inspired activities to support your child's development, check out Monti Kids. I love their toy kits! 


Monday, January 29, 2018

Apple Slicing

I was never a big fan of apples as a child. In fact, I don't think I enjoyed eating apples until I was 23 and living in Morocco. I had never learned how to properly slice an apple, and I thought they were so difficult to eat! As many of you might know, once a child decides they don't like something, these ideas will often stick, which is exactly how I felt about apples. In Morocco, I was shown how to  easily slice apples, and I fell in love with them.
One of the benefits of food preparation activities for children is that they are exposed to different types of foods and ways in which to prepare it. As a child becomes part of the process of preparing something, they are much more inclined to taste it and maybe even realize that they like it!

To prepare the apples, I slice them into three pieces horizontally.

You will need:

  1. Apples (smaller apples will be easier for a child to slice)
  2. A small cutting board
  3. A small plate for the apple cores
  4. An apple slicer
  5. Small tongs to transfer the sliced apples into the serving bowl
  6. A serving bowl (I use a basket that I found in my kitchen)

Why I love this activity: this lesson will allow a child to exert their maximum amount of effort, as strength is required to push down on the apple slicer. Additionally, this activity supports a child's fine motor development, refinement of sense, and ability to follow a logical sequence of movements. Remember, when children prepare food for those around them, they are supporting their sense of community. 


Show your child how to use the tongs to transfer one of the apple slices onto the cutting board. Then, demonstrate how to place the apple slicer onto the apple, making sure the apple core is in the center hole of the slicer. Push the slicer down strongly and show your interest in the crisp sound an apple makes when being sliced (this is a big point of interest for a young child!). Use the tongs to remove the apple core, and show your child how it goes onto the specific plate. Then, show your child how to transfer the now sliced apples pieces into the serving bowl. Remember to move slowly and with purpose, so that your child can study your movements. 

I love seeing the strength of Abbi's hands in this picture. 

Abbi is very focused when using the tongs to remove the slices.

This was an exciting week for many reasons. I received my toddler table and chair set from Sprout Kids, and I cannot wait to set it up. It makes me happy to think about a child working on furniture that is environmentally friendly and sustainable. That is probably one of the reasons I am such a big fan of Monti Kids too since their toys are made with natural materials. This week, Simply Real Foods Market is having a huge sale on organic, natural snacks made without GMOs. I think it is so important to not only provide children with activities for growth, but that their surrounding environment, including the furniture, toys, and foods that they are eating, consist of all natural products. 


Saturday, January 20, 2018

Let's meet!

When sitting down to write this week's post, I realized that I have yet to fully introduce myself! I hope that this post will give you a better understanding of who I am and my love for Montessori-inspired practices, as well as support for the development of young children.


My name is Bérénice, and I am an AMI trained Montessori teacher. I currently work with toddlers between the ages of 18 months to 3 years old. 

About Me

I was born in Madrid, Spain and raised in Louisiana and France. I attended Tulane University where I earned a bachelors degree in Russian History in 2011. While in college, I worked in the Ural Mountains for a Russian summer camp for orphans and underprivileged children of the region for six months. After graduating, I joined the Peace Corps and lived and served as a youth development volunteer in a rural village in Morocco for two and a half years. I completed my Montessori training, for children between the ages of 0-3, and their families, at the Montessori Institute of San Diego. My trainer's passion for and knowledge of Montessori theory was fascinating and inspiring. It was an exciting endeavor, and I look forward to completing my master's of education next summer. Additionally, I recently became a trained Labor Doula through DONA International.

Why do I love Montessori?

Montessori education focuses on providing young children with the proper experiences they will use to create themselves. While the children move freely throughout the environment, it is the adult's role to properly prepare the environment allowing children to thrive. With an understanding of child development, Montessori offers the possibility for parents to support children in different capacities. It is my goal to guide children, so that they can become thriving and successful citizens of the world. 

My Goal

I am obsessed with food preparation ideas for young children because a child can gain so much from working with foods! I decided to write this blog in hopes that parents can duplicate these ideas at home with their own children. Cooking with your child will support their development, while also creating long-lasting memories. 

Opportunities to Work with All Natural Materials

In the Montessori community, we believe in providing children the opportunities to work with all natural materials. This is another way in which we show our respect to children. As I learned more about the importance of providing children with beautiful all natural materials, my desire to find other all natural products to support children and their families also increased. Thus, I partnered with Simply Real Foods Market as my go-to for organic, natural, and Non-GMO products. Additionally, I continue to love Monti Kids' toy kits, as their Montessori-inspired toys are made with natural-colored materials without lights, sounds, and many bright colored patterns, minimizing the possibility of sensory overload. I couldn't agree more with the principles of Sprout Kids. They strive to create spaces that encourage creativity, independence, and confidence, while using natural and sustainable materials. 

Montesorri Is Education for Life

By now you may have realized that Montessori principles can extend to all aspects of your life. I love that Montessori is education for life


The child is capable of developing and giving us tangible proof of the possibility of a better humanity. He has shown us the true process of construction of the human being. We have seen children totally change as they acquire a love for things and as their sense of order, discipline, and self-control develops within them.... The child is both a hope and a promise for mankind
-Maria Montessori

Tuesday, January 9, 2018

Peeling and Slicing Carrots

Before delving into this fun activity, I wanted to share my excitement about continuing to partner with companies who strive to provide families with natural, earth-friendly materials. I recently teamed up with Simply Real Foods Market. I love that their products are organic, natural, and Non-GMO. Additionally, they sell everything at wholesale value! I am continue to love Monti Kids' toy kits. Their Montessori-inspired toys are made with natural-colored materials without lights, sounds, and many bright colored patterns, allowing your child to concentrate without distraction and over-stimulation. Finally, Sprout Kids is my new favorite place for furniture. They strive to create spaces that encourage creativity, independence, and confidence, while using natural and sustainable materials. I recently ordered their table and chair set, and I cannot wait to use it for these cooking activities!

Okay onto this week's activity!

Color coordinating and keeping everything in an orderly fashion supports your child's sense of order.

You will need:

  1. Long carrots (I boil these the night before so that they are softer and easier to peel)
  2. A bowl or container to hold the carrots
  3. A small knife 
  4. A small peeler
  5. A small cutting board
  6. A small pair of tongs to transfer the carrots
  7. A small serving plate on which to place the peeled and sliced carrots
  Why I love this activity: the lesson requires great motor and self control, your child's sense of order is supported, as they must follow a logical sequence of movements, and this serves as a motive for repetition which leads to concentration and the solidification of skills and knowledge. 

Remember to move slowly, as you will want your child to be able to analyze your movements.

Show your child how to transfer a carrot from the bowl to the cutting board with the tongs. Demonstrate how to peel the carrot (because the carrots have been boiled ahead of time, the peels can be eaten) and transfer them onto the serving plate with the tongs. Then, show your child how to slice the carrot using the knife, and finally, demonstrate how to use the tongs to transfer the carrot slices onto the serving plate.

You may remember Abbigail from some of my other posts. I loved observing her concentration and hard work as she followed multiple steps to complete this activity. 

Observe how Abbigail uses her left, non-dominant hand to hold the carrot still, while using her right, dominant hand to peel.
As your child prepares food for their community, whether at school or at home, they are supporting their natural tendency to be part of community!


Wednesday, January 3, 2018

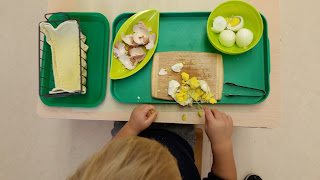
Peeling and Slicing Hard Boiled Eggs


This is one of my favorite food preparation activities. Although the hard boiled eggs have a very strong smell, it is important to remember that this adds to the benefits of this activity because the smell evokes the use of our senses, and toddlers are sensorial learners! 

Remember, color coordinating supports your child's sense of order.

When the eggs are brown, your child can see the difference between the shell and the egg, supporting their sense of sight. This also serves as a point of interest. 
You will need:

1. Brown hard boiled eggs. I boil these ahead of time, so that they are not too hot to peel, and I pre-crack them. 
2. A small cutting board
3. A small knife (this activity may also be done with an egg slicer such as this one).
4. Small tongs
5. A bowl or container for the eggs
6. A bowl for the egg shells
7. A serving bowl for the peeled eggs


Show your child how to peel the eggs. Move slowly and try to minimize your words while you are moving. This will allow your child to concentrate on your actions. Invite your child to peel an egg. Then, show your child how to use the knife to cut the egg (use your non-dominant hand to hold the egg steady while you cut with your dominant hand). Finally, show your child how to transfer the now peeled and cut eggs into the serving bowl. 

This activity can get messy, but this is all part of the learning experience!


My student Tommy loved this activity today. He was so happy when he peeled the shell and "found" the egg! Tommy is two years old and was able to concentrate for almost 40 minutes, as he peeled and sliced over a dozen eggs!
  

You can serve these eggs by themselves or even use them for a soup. I would recommend using them with the broths from Simply Real Foods Market, especially because they are natural, organic, and made without GMOs. 
Also, have you checked out my previous post about my favorite things? You can find links to books and articles I love, as well as information about Monti Kids, my favorite place for Montessori toys.

Tuesday, December 26, 2017

My Favorite Things

Happy Holidays!

I hope everyone is enjoying the holiday season. Because the school is closed for the week, I am unable to showcase a Montessori-inspired cooking activity; therefore, I thought I would share with you a few of my favorite things...


Monti Kids is my all time favorite place to get beautiful Montessori toys. Not only do I love their natural and safe toys, but I also am also a huge fan of their educational tutorial videos that provide you with information on how to present the toys to your child to maximize their learning and development. 

The toy timelines are so helpful!

Living Montessori is my dear friend Lisa's blog. Not only is she AMI trained and works as a Lead Toddler teacher, but she is also a mother to a beautiful six month old girl. She shares her knowledge of Montessori theory, as well as her first hand experience raising a child using Montessori techniques. Her blog is an amazingly helpful resource!

Toilet Awareness by Sarah Moudry is my go-to book for parents who are thinking of beginning the toilet learning process with their child. I always hand out copies of these books to my students' families. The pictures in the book serve as great inspiration when setting up your home to support your child's path to toilet independence. 


Simply Real Foods Market is a great option for those who want to eat organic and Non-GMO products. I cannot wait to use their organic honey in our baking activities! One of the many reasons why I love this company: the natural, organic, and Non-GMO foods are delivered right to your home, and you don't need a membership! 
I love this article because it delves into the difficult process of gaining your child's cooperation without using the word "no." Working in the classroom, we try to eliminate the use of the word no. This can be difficult, as it seems as though we are hard-wired to respond using "no." With a little practice and knowledge of different ways to respond to your child's needs, you can support your child's growth and development while also gaining their cooperation!


Wednesday, December 20, 2017

Making Orange Juice

Juicing is one of my favorite activities to set up for children. When squeezing oranges, children ignite the use of so many senses: sight (the color of oranges can vary so much!), taste (sometimes sweet, sometimes bitter!), touch (the texture is so interesting for a young child!), smell (who doesn't love the smell of fresh oranges?), and hearing (think about the sounds an orange makes when being squeezed!).

You will need:

  1. Many oranges (I like to cut them in half beforehand)
  2. A container to hold the oranges 
  3. A juicer (you can find many versions of the one in the above picture. Remember, the more simple, the better, as this will allow your child to be more involved in the process)
  4. A small cup (please use real glass cups with your child. They are capable!)
  5. A tray to keep the materials organized (your child is in a sensitive period for order, this organization helps to support it)

It is important to have the items placed in order that they will be used from left to right. This is a precursor for literacy, as children learn to work from left to right.

Remember my student Luke who enjoyed making the sun-dried tomato and feta cheese muffins? He also loves the juicing activity!

To begin with, I present Luke with the opportunity to make orange juice and invite him to get a glass from the shelf. Moving slowly to allow Luke the opportunity to analyze my movements, I take one orange, place it on top of the juicer and squeeze while turning, emphasizing my interest in the fact that juice is being made. I put the orange back into the bowl, pick up the juicer, and very slowly pour it into the glass. I then ask Luke to try the juice I have made and invite him to continue working. 

When showing your child this activity, squeezing the juice from the fruit is an important point of interest.

This activity supports the development of coordinated movements.

What is my favorite thing about this activity? Watching a child reap the benefits of their hard work as they enjoy a fresh glass of orange juice!


You can start supporting the development of your child's coordinated movements at a very young age. The kits that Monti Kids offers are my favorite, as they also come with education videos explaining how to introduce each toy to your child!


Thursday, December 14, 2017

Sun-dried Tomato and Feta Cheese Muffins

I am clearly going through a muffin obsession. I really enjoy observing a child practice their hand-eye coordination and support the development of their fine motor skills when they transfer the batter with a spoon into the small holes of a muffin tin!


Transferring from a mixing bowl into specific small holes is great practice for the development of hand-eye coordination!

I love these muffins because they are savory and delicious, and they smell so good while baking! Also the sun-dried tomatoes and feta and cheddar cheeses can be eaten raw, so your child can taste the different flavors while they are baking. Remember, toddlers are sensorial learners, so experiencing different tastes is very important!


You will need:

1. 1 cup of flour (I prefer to use whole wheat flour)
2. 1 tablespoon of baking soda (I usually mix this in with the flour)
3. 1 cup of feta cheese (I break it up beforehand, so it has a crumbly texture)
4. 1 cup of sun-dried tomatoes (I drain the oil and chop them up beforehand)
5. 1 cup of cheddar cheese
6. 1 egg (I substitute 1/4 cup of unsweetened apple sauce)
7. 1/2 cup of vegetable oil
8. 1 cup of water

One of my newest students to join my class, Luke, has recently shown interest in baking. At only 19 months, he is able to transfer all of the ingredients into the bowl, combine them, and transfer the batter into the muffin tins. Luke is a wonderful child, filled with lots of energy, so at times, it can be difficult for him to concentrate for extended periods of time. I enjoyed observing Luke focus for over 45 minutes. Additionally, when we all ate snack together, Luke was so happy to share his work with his classmates.


Luke stands up, pushes in his chair, and walks each empty bowl to the dirty dish cart before returning to his work area to transfer the next ingredients into the mixing bowl. This also gives Luke an opportunity to exert some energy.


I hope to soon use Monti Kids' baking set in my classroom. It could also be a great gift for the child who loves to bake! 


Wednesday, December 6, 2017

Strawberry slicing


Preparing strawberries is such a fun and educational activity for young children. Not only do they smell good, feel interesting, and taste delicious, but they also are nutrient rich and packed with antioxidants! 
I recently came across this article that highlights the importance of having children participate in the kitchen. What stands out to me most is how proud they are after completing their work. While preparing strawberries for our class, it is apparent how hard my student Abbigail works to provide her classmates with snack.

You will need:
  1. Fresh strawberries (I usually cut these in half so that they are more manageable) (You can have your child wash them as an extension, or you should wash them as part of your preparation)
  2. A strawberry slicer (The one I use is shaped like a strawberry, but all types of slicers work, especially the ones typically used to slice hard boiled eggs)
  3. Child-sized tongs
  4. A small cutting board

Keeping everything organized on one tray helps support your child's sense of order.

Why do I love having children use tongs? Development of their fine motor control and coordination.

Why do I love having children use the strawberry slicer? Hand-eye coordination, repetition and  the development of concentration, and the need to follow a logical sequence of events. 


Abbigail uses her two hands for different work simultaneously. 

Abbigail works very hard to provide a fresh snack for her community!

I'm still loving the baking set in Monti Kids' level 7 kit. These freshly-sliced strawberries can also be used in any baking recipe!


Montessori environments...and a little bit of Guacamole too!

Monti Kids' booth last week at an event in L.A. As you all know, I have transitioned out of the classroom and into a full time ro...